|
|
|
 |
|
|
 |
|
 |
 |
|
 |
 |
|
 |
|
General::General Discussion General discussion about EverQuest(tm), EQEMu, and related topics.
Do not post support topics here. |
 |
|
 |

06-01-2014, 02:23 PM
|
|
Discordant
|
|
Join Date: Jan 2005
Posts: 488
|
|
 sweetFX - make eq look uber
Hello Everyone,
I started tinkering with modding eq and stumbled upon something very tasty.
It is called "sweetFX" - what it does is it injects some post-processing to your graphics card for DX 9, 10 and 11.
In laymans terms you can do the following with it (also depends on the game implementation too).
Add film grain effect
Cartoonize the graphics
HDR
bloom
FSAA
MSAA
digital vibrance
etc
Installing it is just a matter of copying the files with the right directory structure into the root of your EQ dir.
I didn't find anything about it on this site (I did some half-assed searches).
I have been experimenting with the settings - I would love it if we could collaborate and find the "best" settings for eq. On the presets site (linked below) there are no Everquest Presets uploaded (yet). There are some for everquest2 (didn't like them) and many many others for many other games.
If someone could do me the favour and show some of the before/after screenshots of what sweetFX can do we can get some serious interest in determining the best presets for eq.
I have only tested this with the underfoot client so far - but i would wager that some of the older, and all of the newer clients would play nice with it.
Now for the links:
SweetFX
http://www.guru3d.com/files_details/..._download.html
Some presets
http://sfx.thelazy.net/games/
__________________
----------
Demon Overlord of Alakamin
skype @ davoodinator
|
 |
|
 |
06-01-2014, 02:29 PM
|
|
Discordant
|
|
Join Date: Jan 2005
Posts: 488
|
|
also examples of sweetFX in use for other games
https://www.flickr.com/search/?q=SweetFX
__________________
----------
Demon Overlord of Alakamin
skype @ davoodinator
|
|
|
|
06-01-2014, 11:09 PM
|
|
Discordant
|
|
Join Date: Jan 2005
Posts: 488
|
|
These are the settings im using
Code:
  /*-----------------------------------------------------------.
  /                       Description                           /
  '------------------------------------------------------------/

   /*-----------------------------------------------------------.
  /                      Choose effects                         /
  '-----------------------------------------------------------*/

// Set to 1 for ON or 0 for OFF
#define USE_SMAA_ANTIALIASING 0 //[0 or 1] SMAA Anti-aliasing : Smoothens jagged lines using the SMAA technique.
#define USE_FXAA_ANTIALIASING 1 //[0 or 1] FXAA Anti-aliasing : Smoothens jagged lines using the FXAA technique
#define USE_EXPLOSION     0 //[0 or 1] Explosion : Scatters the pixels, making the image look fuzzy.
#define USE_CARTOON           0 //[0 or 1] Cartoon : "Toon"s the image.(Interferes with SMAA, CRT, Bloom, HDR and Lumasharpen)
#define USE_ADVANCED_CRT      0 //[0 or 1] Advanced CRT : Simulates an old CRT TV display. Set gaussian blur along with it to get a halation effect
#define USE_BLOOM             1 //[0 or 1] Bloom : Makes bright lights bleed their light into their surroundings (relatively high performance cost)
#define USE_HDR               1 //[0 or 1] HDR : Not actual HDR - It just tries to mimic an HDR look (relatively high performance cost)
#define USE_LUMASHARPEN       0 //[0 or 1] LumaSharpen : Also sharpens the antialiased edges which makes them less smooth - I'm working on fixing that.
#define USE_GAUSSIAN          1 //[0 or 1] Gaussian Blur : can be used to... blur, but also bloom/hazy/glowy look, also unsharp masking
#define USE_FILMGRAIN         0 //[0 or 1] Filmgrain effect
#define USE_TECHNICOLOR       0 //[0 or 1] TECHNICOLOR : Attempts to mimic the look of an old movie using the Technicolor three-strip color process (Techicolor Process 4)
#define USE_DPX               0 //[0 or 1] Cineon DPX : Should make the image look like it's been converted to DXP Cineon - basically it's another movie-like look similar to technicolor.
#define USE_MONOCHROME        0 //[0 or 1] Monochrome : Monochrome makes the colors disappear.
#define USE_LIFTGAMMAGAIN     0 //[0 or 1] Lift Gamma Gain : Adjust brightness and color of shadows, midtones and highlights (avoids clipping)
#define USE_TONEMAP           0 //[0 or 1] Tonemap : Adjust gamma, exposure, saturation, bleach and defog. (may cause clipping)
#define USE_VIBRANCE          1 //[0 or 1] Vibrance : Intelligently saturates (or desaturates if you use negative values) the pixels depending on their original saturation.
#define USE_CURVES            1 //[0 or 1] Curves : Contrast adjustments using S-curves.
#define USE_SEPIA             0 //[0 or 1] Sepia : Sepia tones the image.
#define USE_VIGNETTE          0 //[0 or 1] Vignette : Darkens the edges of the image to make it look more like it was shot with a camera lens. May cause banding artifacts.
#define USE_DITHER            0 //[0 or 1] Dither : Applies dithering to simulate more colors than your monitor can display. This lessens banding artifacts (mostly caused by Vignette)
#define USE_BORDER            0 //[0 or 1] Border : Makes the screenedge black as a workaround for the bright edge that forcing some AA modes sometimes causes.
#define USE_SPLITSCREEN       0 //[0 or 1] Splitscreen : Enables the before-and-after splitscreen comparison mode.

   /*-----------------------------------------------------------.
  /                  Film grain settings                        /
  '-----------------------------------------------------------*/
#define FilmGrainIntensity 0.35  //[0.00 to 1.00] Intensity of grain. Default is 0.46
#define FilmGrainExposure 23     //[0 to 100]     Grain Exposure. Default is 40 (Lower -> darker noise)
#define FilmGrainSize 5.2          //[0 to 10]      Size of the grain. Default is 2 (Higher -> thinner noise)


   /*-----------------------------------------------------------.
  /                  SMAA Anti-aliasing settings                /
  '-----------------------------------------------------------*/

#define SMAA_THRESHOLD 0.12           //[0.05 to 0.20] Edge detection threshold. If SMAA misses some edges try lowering this slightly. I prefer between 0.08 and 0.12.
#define SMAA_MAX_SEARCH_STEPS 98      //[0 to 98] Determines the radius SMAA will search for aliased edges
#define SMAA_MAX_SEARCH_STEPS_DIAG 16  //[0 to 16] Determines the radius SMAA will search for diagonal aliased edges
#define SMAA_CORNER_ROUNDING 100       //[0 to 100] Determines the percent of antialiasing to apply to corners. 0 seems to affect fine text the least so it's the default.

// -- Advanced SMAA settings --
#define COLOR_EDGE_DETECTION 1        //[0 or 1] 1 Enables color edge detection (slower but slightly more acurate) - 0 uses luma edge detection (faster)
#define SMAA_DIRECTX9_LINEAR_BLEND 0  //[0 or 1] Using DX9 HARDWARE? (software version doesn't matter) if so this needs to be 1 - If not, leave it at 0.
                                      //Enable this only if you use a Geforce 7xxx series or older card, or a Radeon X1xxx series or older card.


   /*-----------------------------------------------------------.
  /                  FXAA Anti-aliasing settings                /
  '-----------------------------------------------------------*/
#define FXAA_QUALITY__PRESET 39      //[1 to 39] Choose the quality preset. 39 is the highest quality.
#define fxaa_Subpix 1.000            //[0.000 to 1.000] Choose the amount of sub-pixel aliasing removal.
#define fxaa_EdgeThreshold 0.400     //[0.000 to 1.000] Edge detection threshold. The minimum amount of local contrast required to apply algorithm.
#define fxaa_EdgeThresholdMin 0.030  //[0.000 to 1.000] Darkness threshold. Trims the algorithm from processing darks.

   /*-----------------------------------------------------------.
  /                     Explosion settings                      /
  '-----------------------------------------------------------*/
#define Explosion_Radius    0.5     //[0.2 to 100.0] Amount of effect you want.

   /*-----------------------------------------------------------.
  /                  Cartoon settings                           /
  '-----------------------------------------------------------*/
#define CartoonPower 4.0             //[0.1 to 10.0] Amount of effect you want.
#define CartoonEdgeSlope     1.5     //[0.1 to 8.0] Raise this to filter out fainter edges. You might need to increase the power to compensate. Whole numbers are faster.

   /*-----------------------------------------------------------.
  /                  Advanced CRT settings                     /
  '----------------------------------------------------------*/
#define CRTAmount            1.00    //[0.00 to 1.00]  Amount of CRT effect you want

#define CRTResolutionX       512     //[1 to 2048]     Original input width of the game (ie. 320)
#define CRTResolutionY       304     //[1 to 2048]     Original input height of the game (ie. 240)
#define CRTgamma             2.4     //[0.0 to 4.0]    Gamma of simulated CRT (default 2.4)
#define CRTmonitorgamma      2.2     //[0.0 to 4.0]    Gamma of display monitor (typically 2.2 is correct)
#define CRTBrightness        0.9     //[1.0 to 3.0]    Used to boost brightness a little. Default is 1.0
#define CRTScanlineIntensity 2.0     //[2.0 to 4.0]    Scanlines intensity (use integer values preferably). Default is 2.0
#define CRTScanlineGaussian  1       //[0 or 1]        Use the "new nongaussian scanlines bloom effect". Default is on

#define CRTCurvature         1       //[[0 or 1]          "Barrel effect" enabled (1) or off (0)
#define CRTCurvatureRadius   1.5     //[0.0 to 2.0]       Curvature Radius (only effective when Curvature is enabled). Default is 1.5
#define CRTCornerSize        0.0100  //[0.0000 to 0.0020] Higher values, more rounded corner. Default is 0.001
#define CRTDistance          2.00    //[0.00 to 4.00]     Simulated distance from viewer to monitor. Default is 2.00
#define CRTAngleX            0.00    //[-0.20 to 0.20]    Tilt angle in radians (X coordinates)
#define CRTAngleY            -0.15   //[-0.20 to 0.20]    Tilt angle in radians (Y coordinates). (Value of -0.15 gives the 'arcade tilt' look)
#define CRTOverScan          1.01    //[1.00 to 1.10]     Overscan (e.g. 1.02 for 2% overscan). Default is 1.01
#define CRTOversample        0       //[0 or 1]           Enable 3x oversampling of the beam profile (warning : performance hit)


   /*-----------------------------------------------------------.
  /                  Bloom settings                             /
  '-----------------------------------------------------------*/
#define BloomThreshold 16 //[0.00 to 50.00] Threshold for what is a bright light (that causes bloom) and what isn't.
#define BloomPower 1.446     //[0.000 to 8.000] Strength of the bloom
#define BloomWidth 0.0142    //[0.0000 to 1.0000] Width of the bloom


   /*-----------------------------------------------------------.
  /                  HDR settings                               /
  '-----------------------------------------------------------*/
#define HDRPower 0.98 //[0.00 to 8.00] Strangely lowering this makes the image brighter
#define radius2  0.87  //[0.00 to 8.00] Raising this seems to make the effect stronger and also brighter


   /*-----------------------------------------------------------.
  /                  LumaSharpen settings                       /
  '-----------------------------------------------------------*/
// -- Sharpening --
#define sharp_strength 3.00   //[0.10 to 3.00] Strength of the sharpening
#define sharp_clamp    0.546  //[0.000 to 1.000] Limits maximum amount of sharpening a pixel recieves - Default is 0.035

// -- Advanced sharpening settings --
#define pattern 4        //[1|2|3|4] Choose a sample pattern. 1 = Fast, 2 = Normal, 3 = Wider, 4 = Pyramid shaped.
#define offset_bias 0.2  //[0.0 to 6.0] Offset bias adjusts the radius of the sampling pattern.
                         //I designed the pattern for offset_bias 1.0, but feel free to experiment.

// -- Debug sharpening settings --
#define show_sharpen 0   //[0 or 1] Visualize the strength of the sharpen (multiplied by 4 to see it better)


   /*-----------------------------------------------------------.
  /                  Gaussian Blur settings                     /
  '-----------------------------------------------------------*/
#define GaussEffect 2        //[0|1|2|3]        0 = Blur, 1 = Unsharpmask (expensive), 2 = Bloom, 3 = Sketchy. Default is 2
#define GaussQuality 1       //[0|1|2|3]        Warning: 2 and 3 are expensive. Default is 1
#define GaussSigma 2         //[1 to 4]         The higher the wider blur/bloom is (only effective when Bloom selected)
#define GaussBloomWarmth 0   //[0|1|2]          "Temperature" of the bloom - 0 = neutral, 1 = warm, 2 = hazy/foggy
#define GaussThreshold 0.50  //[0.00 to 1.00]   [DX10/11 only] Threshold for what is a bright light (that causes bloom) and what isn't.
#define GaussExposure 030.0   //[0.00 to 100.00] [DX10/11 only] Exposure of the effect (the lower the brighter)
#define GaussStrength 0.37   //[0.00 to 1.00]   Amount of effect blended into the final image


   /*-----------------------------------------------------------.
  /                  TECHNICOLOR settings                       /
  '-----------------------------------------------------------*/
#define TechniAmount 0.1         //[0.00 to 1.00]
#define TechniPower  6.0         //[0.00 to 8.00]
#define redNegativeAmount   0.88 //[0.00 to 1.00]
#define greenNegativeAmount 0.88 //[0.00 to 1.00]
#define blueNegativeAmount  0.88 //[0.00 to 1.00]


   /*-----------------------------------------------------------.
  /                  Cineon DPX settings                        /
  '-----------------------------------------------------------*/
#define Red   1.0  //[1.0 to 15.0]
#define Green 1.0  //[1.0 to 15.0]
#define Blue  1.0  //[1.0 to 15.0]

#define ColorGamma    1.5  //[0.1 to 2.5] Adjusts the colorfulness of the effect in a manner similar to Vibrance. 1.0 is neutral.
#define DPXSaturation 1.5  //[0.0 to 8.0] Adjust saturation of the effect. 1.0 is neutral.

#define RedC   0.33  //[0.60 to 0.20]
#define GreenC 0.36  //[0.60 to 0.20]
#define BlueC  0.35  //[0.60 to 0.20]

#define Blend 0.10    //[0.00 to 1.00] How strong the effect should be


   /*-----------------------------------------------------------.
  /                  Monochrome settings                        /
  '-----------------------------------------------------------*/
#define Monochrome_conversion_values float3(0.18,0.41,0.41) //[0.00 to 1.00] Percentage of RGB to include (should sum up to 1.00)


   /*-----------------------------------------------------------.
  /                  Lift Gamma Gain settings                   /
  '-----------------------------------------------------------*/
#define RGB_Lift  float3(1.00, 1.01, 1.00)  //[0.000 to 2.000] Adjust shadows for Red, Green and Blue
#define RGB_Gamma float3(1.00, 1.22, 1.03)  //[0.000 to 2.000] Adjust midtones for Red, Green and Blue
#define RGB_Gain  float3(1.00, 1.32, 1.23)  //[0.000 to 2.000] Adjust highlights for Red, Green and Blue


   /*-----------------------------------------------------------.
  /                  Tonemap settings                           /
  '-----------------------------------------------------------*/
#define Gamma 1.0                      //[0.000 to 2.000] Adjust midtones
#define Exposure 0.0                     //[-1.000 to 1.000] Adjust exposure
#define Saturation 0.000                   //[-1.000 to 1.000] Adjust saturation
#define Bleach 0.00                       //[0.000 to 1.000] Brightens the shadows and fades the colors
#define Defog 0.030                       //[0.000 to 1.000] How much of the color tint to remove
#define FogColor float3(2.55, 2.55, 2.55) //[0.00 to 2.55, 0.00 to 2.55, 0.00 to 2.55] What color to remove - default is blue


   /*-----------------------------------------------------------.
  /                  Vibrance settings                          /
  '-----------------------------------------------------------*/
#define Vibrance 1.00 //[-1.00 to 1.00] Intelligently saturates (or desaturates if you use negative values) the pixels depending on their original saturation.
#define Vibrance_RGB_balance float3(1.00, 1.00, 1.00) //[-10.00 to 10.00,-10.00 to 10.00,-10.00 to 10.00] A per channel multiplier to the Vibrance strength so you can give more boost to certain colors over others

   /*-----------------------------------------------------------.
  /                  Curves settings                            /
  '-----------------------------------------------------------*/
#define Curves_mode 0        //[0|1|2] Choose what to apply contrast to. 0 = Luma, 1 = Chroma, 2 = both Luma and Chroma. Default is 0 (Luma)
#define Curves_contrast 0.55 //[-1.00 to 1.00] The amount of contrast you want

// -- Advanced curve settings --
#define Curves_formula 3     //[1|2|3|4|5|6|7|8|9] The contrast s-curve you want to use.
                             //1 = Sine, 2 = Abs split, 3 = Smoothstep, 4 = Exp formula, 5 = Simplified Catmull-Rom (0,0,1,1), 6 = Perlins Smootherstep
                             //7 = Abs add, 8 = Techicolor Cinestyle, 9 = Parabola.
                             //Note that Technicolor Cinestyle is practically identical to Sine, but runs slower. In fact I think the difference might only be due to rounding errors.
                             //I prefer 2 myself, but 3 is a nice alternative with a little more effect (but harsher on the highlight and shadows) and it's the fastest formula.


   /*-----------------------------------------------------------.
  /                  Sepia settings                             /
  '-----------------------------------------------------------*/
#define ColorTone float3(1.90, 1.50, 1.20) //[0.00 to 2.55, 0.00 to 2.55, 0.00 to 2.55] What color to tint the image
#define GreyPower  0.11                    //[0.00 to 1.00] How much desaturate the image before tinting it
#define SepiaPower 0.90                    //[0.00 to 1.00] How much to tint the image


   /*-----------------------------------------------------------.
  /                  Vignette settings                          /
  '-----------------------------------------------------------*/
#define VignetteRatio 30.00    //[0.15 to 6.00]  Sets a width to height ratio. 1.00 (1/1) is perfectly round, while 1.60 (16/10) is 60 % wider than it's high.
#define VignetteRadius 12.68   //[-1.00 to 3.00] lower values = stronger radial effect from center
#define VignetteAmount -2.00  //[-2.00 to 1.00] Strength of black. -2.00 = Max Black, 1.00 = Max White.
#define VignetteSlope 28       //[1 to 16] How far away from the center the change should start to really grow strong (odd numbers cause a larger fps drop than even numbers)
#define VignetteCenter float2(0.500, 0.500)  //[0.000 to 1.000, 0.000 to 1.000] Center of effect.


   /*-----------------------------------------------------------.
  /                  Dither settings                            /
  '-----------------------------------------------------------*/
#define dither_method 2  //[1 or 2] 1 = Ordering dithering (good and very fast), 2 = Random dithering (even better dithering but not as fast)

//Note that the patterns used by Dither, makes an image harder to compress.
//This can make your screenshots and video recordings take up more space.


   /*-----------------------------------------------------------.
  /                  Border settings                            /
  '-----------------------------------------------------------*/
#define border_width float2(0,0)     //[0 to 2048, 0 to 2048] (X,Y)-width of the border. Measured in pixels.
#define border_color float3(0, 0, 0)  //[0 to 255, 0 to 255, 0 to 255] What color the border should be. In integer RGB colors, meaning 0,0,0 is black and 255,255,255 is full white.

   /*-----------------------------------------------------------.
  /                  Splitscreen settings                       /
  '-----------------------------------------------------------*/
#define splitscreen_mode 1  //[1|2|3|4|5]  1 = Vertical 50/50 split, 2 = Vertical 25/50/25 split, 3 = Vertical 50/50 angled split, 4 = Horizontal 50/50 split, 5 = Horizontal 25/50/25 split


   /*-----------------------------------------------------------.
  /                  Key settings                               /
  '-----------------------------------------------------------*/
// This is the section where you can define your own key mapping
// See the following URL to find out what keycode a key has:
// http://www.cambiaresearch.com/articles/15/javascript-char-codes-key-codes

// key_toggle_sweetfx = 145
// key_screenshot     = 44 ; 44 = PrtSrc
// key_reload_sweetfx = 19


   /*-----------------------------------------------------------.
  /                  Misc settings                              /
  '-----------------------------------------------------------*/
// You can load and chain other DirectX wrappers (ENB, Helix, Windower...)
// If the external wrapper is already named d3d9.dll, rename it into
// something else like "d3d9_enb.dll" (note that even if this is commented it actually works)

// external_d3d9_wrapper = none
// external_dxgi_wrapper = none
__________________
----------
Demon Overlord of Alakamin
skype @ davoodinator
|
|
|
|
06-01-2014, 11:10 PM
|
 |
Administrator
|
|
Join Date: Feb 2009
Location: MN
Posts: 2,071
|
|
What a smoke show. Show some screenshots!
|
06-02-2014, 12:05 AM
|
 |
Discordant
|
|
Join Date: Jun 2006
Posts: 371
|
|
Unrelated to SweetFX, but worth mentioning some it ties in with image quality graphic enhancement stuff in general I like Rivatuner. In particular it's LODbiasRange under power user setting [Nvidia\ATI]\global set to 15 which allows you to increase Mipmap LOD bias adjustment range +/- 15 rather than 3 by default within RivaTuner it's normal setting itself is 0, but I set it to +15 to make textures appear extra sharp -15 would do the opposite making them blurry and more retro low resolution. Rivatuner is no longer updated which means only manually added new driver support, but you can use RivaTuner\System ForceDriverVersion to update driver versions. My driver version is 295.73 so it became ForceDriverVersion "29573" you drop the decimal point.
__________________
"We are all on the same team, and I think not enough people realize this."
- Leetsauce
|
06-02-2014, 08:21 AM
|
 |
Discordant
|
|
Join Date: Apr 2014
Location: United Kingdom
Posts: 276
|
|
Oh dear, I could waste some hours with this....
|
06-02-2014, 03:42 PM
|
|
Discordant
|
|
Join Date: Jan 2005
Posts: 488
|
|
OK so like i want to put some images inline.. how do i do it?
__________________
----------
Demon Overlord of Alakamin
skype @ davoodinator
|
06-02-2014, 03:54 PM
|
|
Discordant
|
|
Join Date: Jan 2005
Posts: 488
|
|
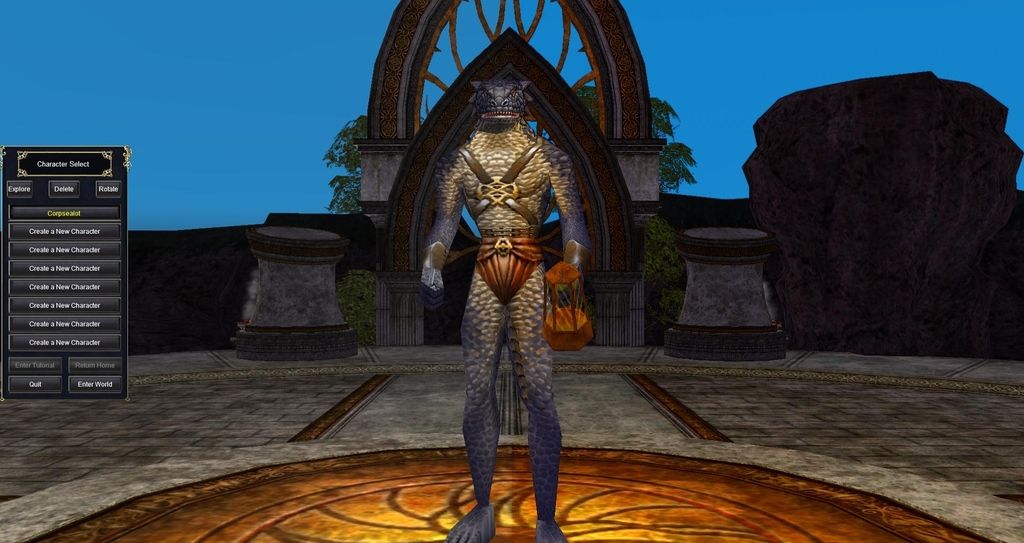
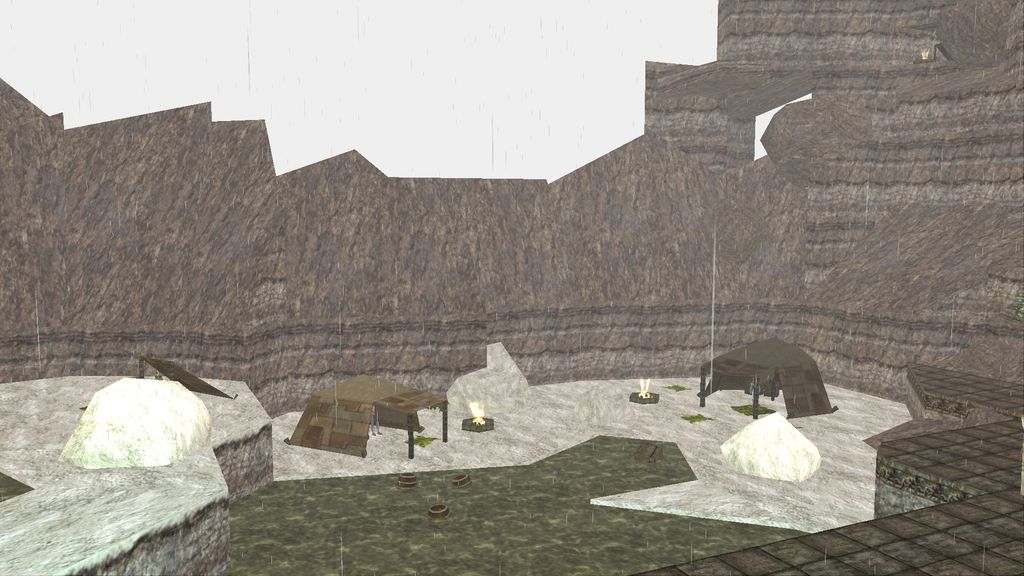
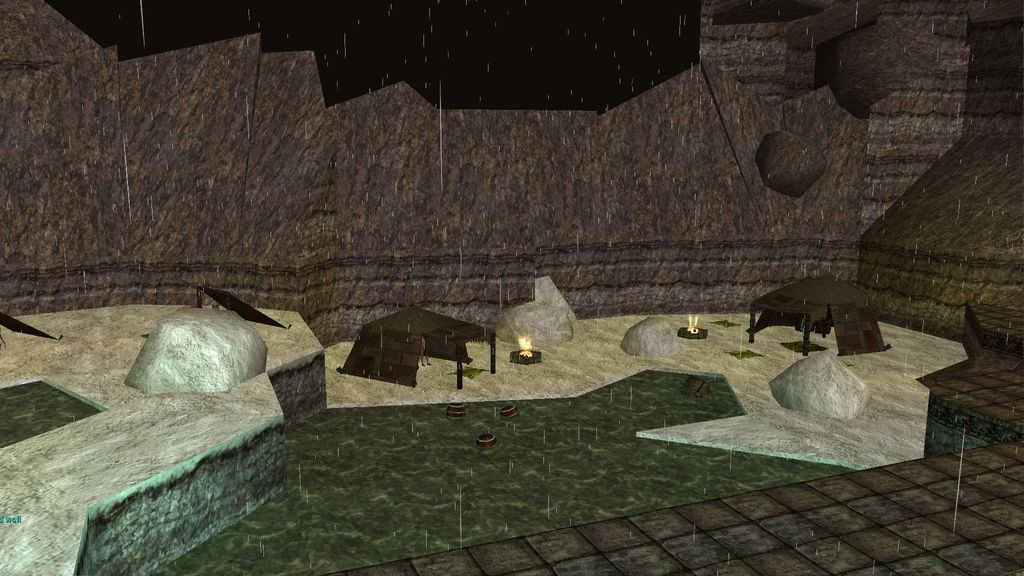
SweetFX ON (with the settings I listed above)

SweetFX off

i'd really like it if someone can figure out how to make film grain display properly i have it disabled in my settings atm
__________________
----------
Demon Overlord of Alakamin
skype @ davoodinator
|
06-02-2014, 04:38 PM
|
|
Discordant
|
|
Join Date: Jan 2005
Posts: 488
|
|
if someone can get
http://enbdev.com/download.htm
working with sweetFX in EQ1 i will forever be grateful. I have them both working in skyrim and it is just W O N D E R F U L
enb takes care of fancy lighting and it is just pure magic
__________________
----------
Demon Overlord of Alakamin
skype @ davoodinator
|
06-03-2014, 01:55 AM
|
|
Discordant
|
|
Join Date: Apr 2014
Location: United Kingdom
Posts: 276
|
|
Played around with this for a while and didn't find anything that really made it look any better. Kinda like polishing a turd. Also, it seems to interfere with WinEQ.
|
06-05-2014, 01:08 PM
|
|
Discordant
|
|
Join Date: Jan 2005
Posts: 488
|
|
well EQ is kind of shitty in terms of its graphics but you can still make it nicer
if anyone out there has scatological tendencies, maybe they can provide some input as to the best way to "truss up" the turd that is the eq graphics engine.
__________________
----------
Demon Overlord of Alakamin
skype @ davoodinator
|
06-05-2014, 05:26 PM
|
|
Discordant
|
|
Join Date: Jun 2006
Posts: 371
|
|
EQ's graphics engine can look fairly good despite it's age with higher resolution textures. It just looks more dated and lower resolution primarily. It has it's other qwerks like being lower poly and some issues with geometry where some of it should have been rotated 90 degree's where it got textured wrongly.
__________________
"We are all on the same team, and I think not enough people realize this."
- Leetsauce
|
08-01-2015, 02:01 AM
|
|
Discordant
|
|
Join Date: Jun 2006
Posts: 371
|
|
I need to look into this more has more potential than I realized initially. I read up a little on SweetFX while kind of researching on the subject about scaling filters particularly xBRZ/HQX are amazing. Anyway I didn't realize SweetFX had a unsharp mask option that's big for me since I like negative LOD bias tweak a lot which is similar I my graphic quality a bit on the sharp side for better texture image quality clarity so that certainly holds potential for me.
On the subject of scaling filters I came across this link as well it seems like you may be able to inject a HQX filter with ReShade SweetFX which has the potential to look quite neat. I defiantly need to play around with some of this stuff. Lots of cool stuff to tweak and explore.
http://reshade.me/forum/shader-sugge...s?limitstart=0
__________________
"We are all on the same team, and I think not enough people realize this."
- Leetsauce
|
|
|
|
08-01-2015, 09:07 AM
|
|
Discordant
|
|
Join Date: Jun 2006
Posts: 371
|
|
SweetFX_config.exe doesn't seem to work it asks you to start EverQuest.exe when you set eqgame.exe, but put put the SweetFX files into the EQ directory and they work and you can configure them manually by with SweetFX_settings.txt
My current settings thus far are the following, but note I've only enabled & adjust settings for
#define USE_CARTOON 1 [toons image makes it look a bit cartoon like I set it conservative more messes w/text]
#define USE_LUMASHARPEN 1 [sharpens image I manually tweaked this til I had what felt it was best image quality]
#define USE_VIBRANCE 1 [used to over or under saturate colors to make them dull or in your face]
and I enabled, but didn't adjust either of these two settings
#define USE_DITHER 1 [has two configuration options, but was all ready set for better option by default]
#define USE_SPLITSCREEN 1 [to visualize the tweak adjustment split screen representation]
Split screen is just for demonstration disable it if you like the look obviously. I'll probably experiment with it more another time with a few of other settings I didn't get around to testing out. I'm still really curious about the ReShade and scaling filters.
Quote:
/*-----------------------------------------------------------.
/ Description /
'------------------------------------------------------------/
Game:
Author:
SweetFX version: 1.5.1
Description:
Please note when tweaking settings that higher numbers does not always equal better (nor
does lower).
Finding the best settings for your game and your taste is about finding just the right
amount to apply.
If you made a good setttings preset please share it with your friends, on forums and
websites,
and/or submit it to the SweetFX Settings Database : http://sfx.thelazy.net/games/
This description field and the above Game and Author fields are here so you can fill in your
own details for the presets you create.
Just delete this description and fill in your own and then share it with the world.
Hope you enjoy my mod.
- CeeJay.dk
/*-----------------------------------------------------------.
/ Choose effects /
'-----------------------------------------------------------*/
// Set to 1 for ON or 0 for OFF
#define USE_SMAA_ANTIALIASING 0 //[0 or 1] SMAA Anti-aliasing : Smoothens jagged lines using
the SMAA technique.
#define USE_FXAA_ANTIALIASING 0 //[0 or 1] FXAA Anti-aliasing : Smoothens jagged lines using
the FXAA technique. WIP - Currently only works in DX9 and you need to use the FXAA injector
dlls.
#define USE_EXPLOSION 0 //[0 or 1] Explosion : Scatters the pixels, making the image
look fuzzy.
#define USE_CARTOON 1 //[0 or 1] Cartoon : "Toon"s the image. (Interferes with SMAA,
CRT, Bloom, HDR and Lumasharpen)
#define USE_ADVANCED_CRT 0 //[0 or 1] Advanced CRT : Simulates an old CRT TV display.
(Interferes with SMAA, Cartoon, Bloom, HDR and Lumasharpen, and it has a very high
performance cost)
#define USE_BLOOM 0 //[0 or 1] Bloom : Makes bright lights bleed their light into
their surroundings (relatively high performance cost)
#define USE_HDR 0 //[0 or 1] HDR : Not actual HDR - It just tries to mimic an HDR
look (relatively high performance cost)
#define USE_LUMASHARPEN 1 //[0 or 1] LumaSharpen : Also sharpens the antialiased edges
which makes them less smooth - I'm working on fixing that.
#define USE_LEVELS 0 //[0 or 1] Levels : Sets a new black and white point. This
increases contrast but causes clipping. Use Curves instead if you want to avoid that.
#define USE_TECHNICOLOR 0 //[0 or 1] TECHNICOLOR : Attempts to mimic the look of an old
movie using the Technicolor three-strip color process (Techicolor Process 4)
#define USE_DPX 0 //[0 or 1] Cineon DPX : Should make the image look like it's
been converted to DXP Cineon - basically it's another movie-like look similar to
technicolor.
#define USE_MONOCHROME 0 //[0 or 1] Monochrome : Monochrome makes the colors disappear.
#define USE_LIFTGAMMAGAIN 0 //[0 or 1] Lift Gamma Gain : Adjust brightness and color of
shadows, midtones and highlights
#define USE_TONEMAP 0 //[0 or 1] Tonemap : Adjust gamma, exposure, saturation, bleach
and defog. (may cause clipping)
#define USE_VIBRANCE 0 //[0 or 1] Vibrance : Intelligently saturates (or desaturates if
you use negative values) the pixels depending on their original saturation.
#define USE_CURVES 0 //[0 or 1] Curves : Contrast adjustments using S-curves.
#define USE_SEPIA 0 //[0 or 1] Sepia : Sepia tones the image.
#define USE_VIGNETTE 0 //[0 or 1] Vignette : Darkens the edges of the image to make it
look more like it was shot with a camera lens. May cause banding artifacts.
#define USE_DITHER 1 //[0 or 1] Dither : Applies dithering to simulate more colors
than your monitor can display. This lessens banding artifacts (mostly caused by Vignette)
#define USE_BORDER 0 //[0 or 1] Border : Makes the screenedge black as a workaround
for the bright edge that forcing some AA modes sometimes causes.
#define USE_SPLITSCREEN 1 //[0 or 1] Splitscreen : Enables the before-and-after
splitscreen comparison mode.
#define USE_CUSTOM 0 //[0 or 1] Custom : Write your own shader by editing custom.h,
and then enable it here.
/*-----------------------------------------------------------.
/ SMAA Anti-aliasing settings /
'-----------------------------------------------------------*/
#define SMAA_THRESHOLD 0.10 //[0.05 to 0.20] Edge detection threshold. If SMAA
misses some edges try lowering this slightly. I prefer between 0.08 and 0.12.
#define SMAA_MAX_SEARCH_STEPS 16 //[0 to 98] Determines the radius SMAA will search
for aliased edges
#define SMAA_MAX_SEARCH_STEPS_DIAG 6 //[0 to 16] Determines the radius SMAA will search
for diagonal aliased edges
#define SMAA_CORNER_ROUNDING 0 //[0 to 100] Determines the percent of antialiasing
to apply to corners. 0 seems to affect fine text the least so it's the default.
// -- Advanced SMAA settings --
#define COLOR_EDGE_DETECTION 1 //[0 or 1] 1 Enables color edge detection (slower
but slightly more acurate) - 0 uses luma edge detection (faster)
#define SMAA_DIRECTX9_LINEAR_BLEND 0 //[0 or 1] Using DX9 HARDWARE? (software version
doesn't matter) if so this needs to be 1 - If not, leave it at 0.
//Enable this only if you use a Geforce 7xxx series
or older card, or a Radeon X1xxx series or older card.
/*-----------------------------------------------------------.
/ FXAA Anti-aliasing settings /
'-----------------------------------------------------------*/
#define FXAA_QUALITY__PRESET 9 //[1 to 9] Choose the quality preset. 9 is the
highest quality.
#define fxaa_Subpix 0.400 //[0.000 to 1.000] Choose the amount of sub-pixel
aliasing removal.
#define fxaa_EdgeThreshold 0.250 //[0.000 to 1.000] Edge detection threshold. The
minimum amount of local contrast required to apply algorithm.
#define fxaa_EdgeThresholdMin 0.060 //[0.000 to 1.000] Darkness threshold. Trims the
algorithm from processing darks.
/*-----------------------------------------------------------.
/ Explosion settings /
'-----------------------------------------------------------*/
#define Explosion_Radius 2.5 //[0.2 to 100.0] Amount of effect you want.
/*-----------------------------------------------------------.
/ Cartoon settings /
'-----------------------------------------------------------*/
#define CartoonPower 0.1 //[0.1 to 10.0] Amount of effect you want.
#define CartoonEdgeSlope 0.4 //[0.1 to 8.0] Raise this to filter out fainter edges.
You might need to increase the power to compensate. Whole numbers are faster.
/*----------------------------------------------------------.
/ Advanced CRT settings /
'----------------------------------------------------------*/
#define CRTAmount 1.00 //[0.00 to 1.00] Amount of CRT effect you want
#define CRTResolution 2.0 //[1.0 to 8.0] Input size coefficent (low values
gives the "low-res retro look"). Default is 1.2
#define CRTgamma 2.2 //[0.0 to 4.0] Gamma of simulated CRT (default 2.2)
#define CRTmonitorgamma 2.4 //[0.0 to 4.0] Gamma of display monitor (typically
2.2 is correct)
#define CRTBrightness 1.2 //[1.0 to 3.0] Used to boost brightness a little.
Default is 1.0
#define CRTScanlineIntensity 2.0 //[2.0 to 4.0] Scanlines intensity (use integer
values preferably). Default is 2.0
#define CRTScanlineGaussian 1 //[0 or 1] Use the "new nongaussian scanlines
bloom effect". Default is on
#define CRTCurvature 1 //[[0 or 1] "Barrel effect" enabled (1) or off
(0)
#define CRTCurvatureRadius 2.0 //[0.0 to 2.0] Curvature Radius (only effective
when Curvature is enabled). Default is 1.5
#define CRTCornerSize 0.0100 //[0.0000 to 0.0020] Higher values, more rounded
corner. Default is 0.001
#define CRTDistance 2.00 //[0.00 to 4.00] Simulated distance from viewer to
monitor. Default is 2.00
#define CRTAngleX 0.00 //[-0.20 to 0.20] Tilt angle in radians (X
coordinates)
#define CRTAngleY -0.15 //[-0.20 to 0.20] Tilt angle in radians (Y
coordinates). (Value of -0.15 gives the 'arcade tilt' look)
#define CRTOverScan 1.00 //[1.00 to 1.10] Overscan (e.g. 1.02 for 2%
overscan). Default is 1.01
#define CRTOversample 0 //[0 or 1] Enable 3x oversampling of the beam
profile (warning : performance hit)
/*-----------------------------------------------------------.
/ Bloom settings /
'-----------------------------------------------------------*/
#define BloomThreshold 20.25 //[0.00 to 50.00] Threshold for what is a bright light (that
causes bloom) and what isn't.
#define BloomPower 1.446 //[0.000 to 8.000] Strength of the bloom
#define BloomWidth 0.0142 //[0.0000 to 1.0000] Width of the bloom
/*-----------------------------------------------------------.
/ HDR settings /
'-----------------------------------------------------------*/
#define HDRPower 1.30 //[0.00 to 8.00] Strangely lowering this makes the image brighter
#define radius2 0.87 //[0.00 to 8.00] Raising this seems to make the effect stronger and
also brighter
/*-----------------------------------------------------------.
/ LumaSharpen settings /
'-----------------------------------------------------------*/
// -- Sharpening --
#define sharp_strength 1.0 //[0.10 to 3.00] Strength of the sharpening
#define sharp_clamp 1.0 //[0.000 to 1.000] Limits maximum amount of sharpening a pixel
recieves - Default is 0.035
// -- Advanced sharpening settings --
#define pattern 2 //[1|2|3|4] Choose a sample pattern. 1 = Fast, 2 = Normal, 3 =
Wider, 4 = Pyramid shaped.
#define offset_bias 0.1 //[0.0 to 6.0] Offset bias adjusts the radius of the sampling
pattern.
//I designed the pattern for offset_bias 1.0, but feel free to
experiment.
// -- Debug sharpening settings --
#define show_sharpen 0 //[0 or 1] Visualize the strength of the sharpen (multiplied by 4
to see it better)
/*----------------------------------------------------------.
/ Levels settings /
'----------------------------------------------------------*/
#define Levels_black_point 16 //[0 to 255] The black point is the new black - literally.
Everything darker than this will become completely black. Default is 16.0
#define Levels_white_point 235 //[0 to 255] The new white point. Everything brighter than
this becomes completely white. Default is 235.0
//Colors between the two points will stretched, which increases contrast, but details above
and below the points are lost (this is called clipping).
/*-----------------------------------------------------------.
/ TECHNICOLOR settings /
'-----------------------------------------------------------*/
#define TechniAmount 0.4 //[0.00 to 1.00]
#define TechniPower 4.0 //[0.00 to 8.00]
#define redNegativeAmount 0.88 //[0.00 to 1.00]
#define greenNegativeAmount 0.88 //[0.00 to 1.00]
#define blueNegativeAmount 0.88 //[0.00 to 1.00]
/*-----------------------------------------------------------.
/ Cineon DPX settings /
'-----------------------------------------------------------*/
#define Red 8.0 //[1.0 to 15.0]
#define Green 8.0 //[1.0 to 15.0]
#define Blue 8.0 //[1.0 to 15.0]
#define ColorGamma 2.5 //[0.1 to 2.5] Adjusts the colorfulness of the effect in a manner
similar to Vibrance. 1.0 is neutral.
#define DPXSaturation 3.0 //[0.0 to 8.0] Adjust saturation of the effect. 1.0 is neutral.
#define RedC 0.36 //[0.60 to 0.20]
#define GreenC 0.36 //[0.60 to 0.20]
#define BlueC 0.34 //[0.60 to 0.20]
#define Blend 0.2 //[0.00 to 1.00] How strong the effect should be.
/*-----------------------------------------------------------.
/ Monochrome settings /
'-----------------------------------------------------------*/
#define Monochrome_conversion_values float3(0.18,0.41,0.41) //[0.00 to 1.00] Percentage of
RGB to include (should sum up to 1.00)
/*-----------------------------------------------------------.
/ Lift Gamma Gain settings /
'-----------------------------------------------------------*/
#define RGB_Lift float3(1.000, 1.000, 1.000) //[0.000 to 2.000] Adjust shadows for Red,
Green and Blue.
#define RGB_Gamma float3(1.000, 1.000, 1.000) //[0.000 to 2.000] Adjust midtones for Red,
Green and Blue
#define RGB_Gain float3(1.000, 1.000, 1.000) //[0.000 to 2.000] Adjust highlights for Red,
Green and Blue
//Note that a value of 1.000 is a neutral setting that leave the color unchanged.
/*-----------------------------------------------------------.
/ Tonemap settings /
'-----------------------------------------------------------*/
#define Gamma 1.000 //[0.000 to 2.000] Adjust midtones. 1.000 is neutral. This
setting does exactly the same as the one in Lift Gamma Gain, only with less control.
#define Exposure 0.000 //[-1.000 to 1.000] Adjust exposure
#define Saturation 0.000 //[-1.000 to 1.000] Adjust saturation
#define Bleach 0.000 //[0.000 to 1.000] Brightens the shadows and fades the colors
#define Defog 0.000 //[0.000 to 1.000] How much of the color tint to remove
#define FogColor float3(0.00, 0.00, 2.55) //[0.00 to 2.55, 0.00 to 2.55, 0.00 to 2.55] What
color to remove - default is blue
/*-----------------------------------------------------------.
/ Vibrance settings /
'-----------------------------------------------------------*/
#define Vibrance 0.25 //[-1.00 to 1.00] Intelligently saturates (or desaturates if you
use negative values) the pixels depending on their original saturation.
#define Vibrance_RGB_balance float3(1.00, 1.00, 1.00) //[-10.00 to 10.00,-10.00 to
10.00,-10.00 to 10.00] A per channel multiplier to the Vibrance strength so you can give
more boost to certain colors over others
/*-----------------------------------------------------------.
/ Curves settings /
'-----------------------------------------------------------*/
#define Curves_mode 0 //[0|1|2] Choose what to apply contrast to. 0 = Luma, 1 =
Chroma, 2 = both Luma and Chroma. Default is 0 (Luma)
#define Curves_contrast 0.15 //[-1.00 to 1.00] The amount of contrast you want
// -- Advanced curve settings --
#define Curves_formula 2 //[1|2|3|4|5|6|7|8|9|10] The contrast s-curve you want to use.
//1 = Sine, 2 = Abs split, 3 = Smoothstep, 4 = Exp formula, 5 =
Simplified Catmull-Rom (0,0,1,1), 6 = Perlins Smootherstep
//7 = Abs add, 8 = Techicolor Cinestyle, 9 = Parabola, 10 =
Half-circles.
//Note that Technicolor Cinestyle is practically identical to
Sine, but runs slower. In fact I think the difference might only be due to rounding errors.
//I prefer 2 myself, but 3 is a nice alternative with a little
more effect (but harsher on the highlight and shadows) and it's the fastest formula.
/*-----------------------------------------------------------.
/ Sepia settings /
'-----------------------------------------------------------*/
#define ColorTone float3(1.40, 1.10, 0.90) //[0.00 to 2.55, 0.00 to 2.55, 0.00 to 2.55] What
color to tint the image
#define GreyPower 0.11 //[0.00 to 1.00] How much desaturate the image
before tinting it
#define SepiaPower 0.58 //[0.00 to 1.00] How much to tint the image
/*-----------------------------------------------------------.
/ Vignette settings /
'-----------------------------------------------------------*/
#define VignetteType 1 //[1|2|3] 1 = Original, 2 = New, 3 = TV style
#define VignetteRatio 1.00 //[0.15 to 6.00] Sets a width to height ratio. 1.00 (1/1) is
perfectly round, while 1.60 (16/10) is 60 % wider than it's high.
#define VignetteRadius 1.00 //[-1.00 to 3.00] lower values = stronger radial effect from
center
#define VignetteAmount -1.00 //[-2.00 to 1.00] Strength of black. -2.00 = Max Black, 1.00 =
Max White.
#define VignetteSlope 8 //[2 to 16] How far away from the center the change should
start to really grow strong (odd numbers cause a larger fps drop than even numbers)
#define VignetteCenter float2(0.500, 0.500) //[0.000 to 1.000, 0.000 to 1.000] Center of
effect for VignetteType 1. 2 and 3 do not obey this setting.
/*-----------------------------------------------------------.
/ Dither settings /
'-----------------------------------------------------------*/
#define dither_method 1 //[1 or 2] 1 = Ordered dithering (very good and very fast), 2
= Random dithering (different but slightly slower dithering)
//Note that the patterns used by Dither, makes an image harder to compress.
//This can make your screenshots and video recordings take up more space.
/*-----------------------------------------------------------.
/ Border settings /
'-----------------------------------------------------------*/
#define border_width float2(1,20) //[0 to 2048, 0 to 2048] (X,Y)-width of the border.
Measured in pixels.
#define border_color float3(0, 0, 0) //[0 to 255, 0 to 255, 0 to 255] What color the border
should be. In integer RGB colors, meaning 0,0,0 is black and 255,255,255 is full white.
/*-----------------------------------------------------------.
/ Splitscreen settings /
'-----------------------------------------------------------*/
#define splitscreen_mode 1 //[1|2|3|4|5|6] 1 = Vertical 50/50 split, 2 = Vertical
25/50/25 split, 3 = Vertical 50/50 angled split, 4 = Horizontal 50/50 split, 5 = Horizontal
25/50/25 split, 6 = Curvy vertical 50/50 split
/*-----------------------------------------------------------.
/ Custom settings /
'-----------------------------------------------------------*/
#define custom_strength 1.0 //[0.00 to 1.00] Adjust the strength of the effect
|
__________________
"We are all on the same team, and I think not enough people realize this."
- Leetsauce
|
|
|
|
|
|
|
08-02-2015, 07:23 PM
|
|
Discordant
|
|
Join Date: Jun 2006
Posts: 371
|
|
I'll probably tweak it more, but this is how the above settings I posted look like for EQ.
Also here's what some LOD bias tweaks do as well. at +15, +10, +3, -3 LOD bias values.
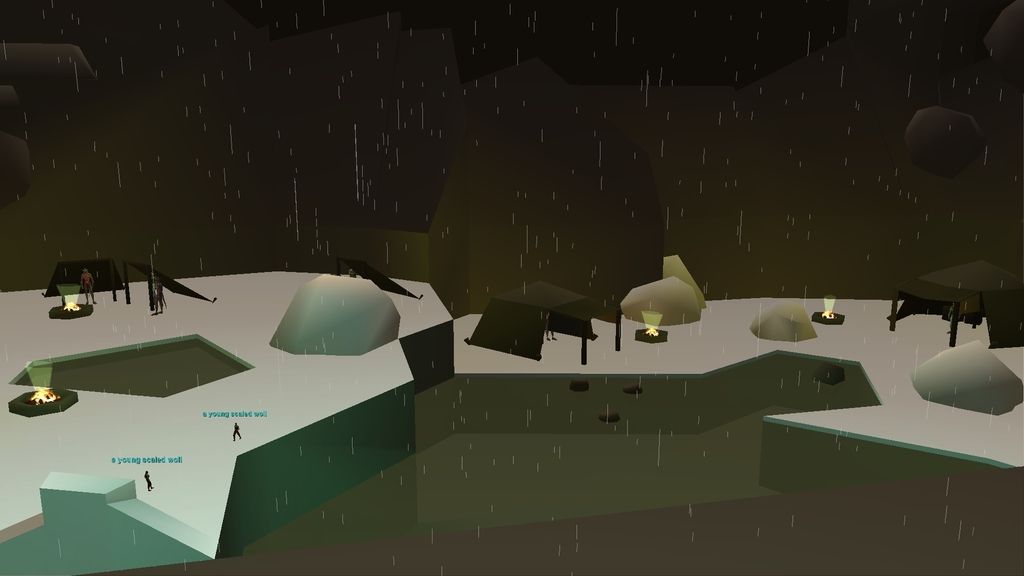
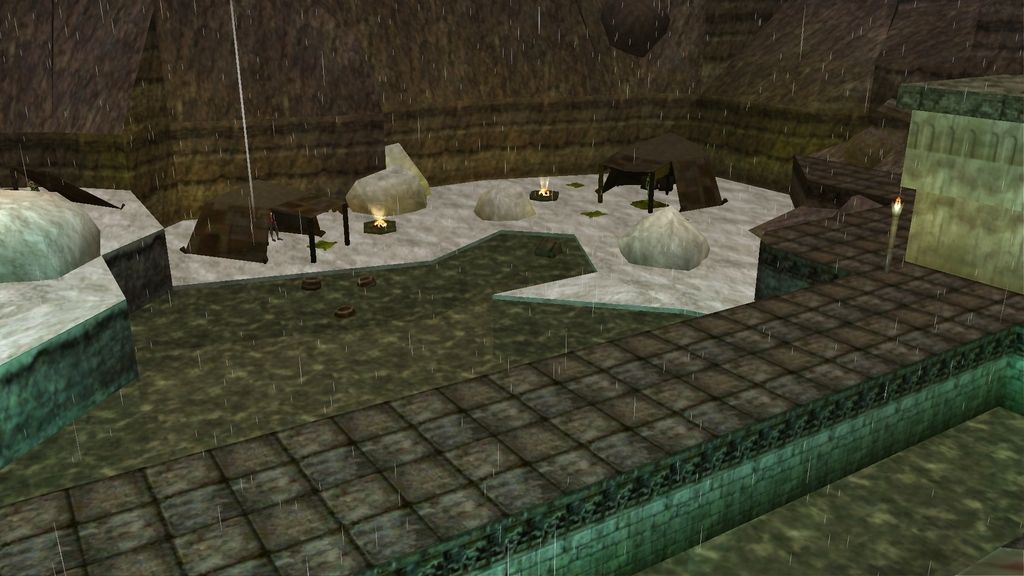
Another SweetFX photo showing tweaks setting values above.
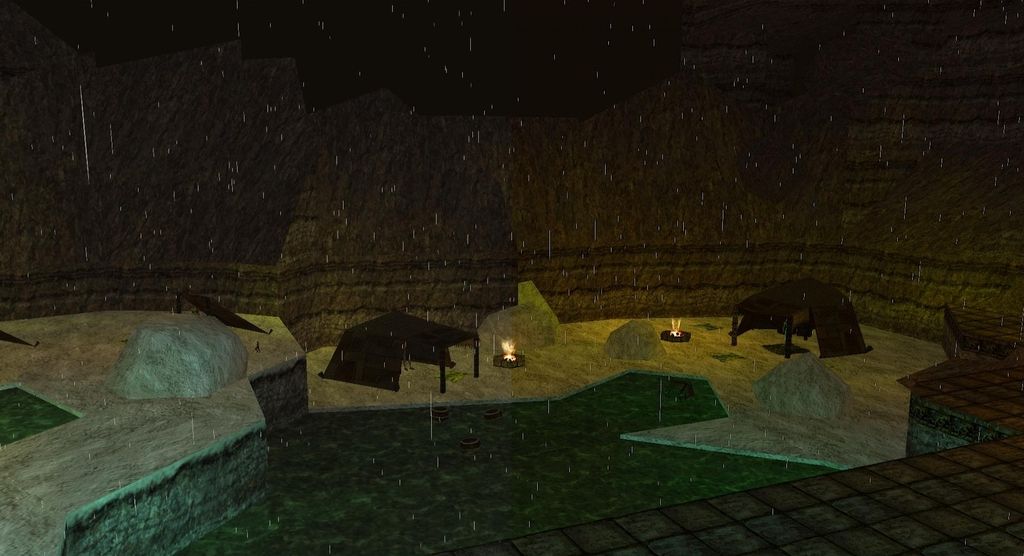
I'd still like to try some other settings like SMAA/FXAA/Bloom/HDR and probably a few others as well. I may tone down the vibrance setting from 0.25 to 0.20 or even 0.10 instead not sure it needs quite that much extra saturation default SweetFX setting for it was 0.15, but that's kind of a odd setting I felt to leave it at so tried a bit higher which I felt would work well with cartoon settings 20-25% increase seems more appropriate and natural to me. Overall I think it looks a bit less washed out and grey scale under saturated feeling than it looks by default with just a slight hint of cartoon look added it looks noticeably warmer and more inviting now and a touch more colorful, but not glaringly over saturated LumaSharpen helped a lot also to increase image sharpness clarity tweaked it just to the point where I didn't notice obvious artifacts from over sharpening.
__________________
"We are all on the same team, and I think not enough people realize this."
- Leetsauce
|
|
|
|
 Posting Rules
|
You may not post new threads
You may not post replies
You may not post attachments
You may not edit your posts
HTML code is Off
|
|
|
All times are GMT -4. The time now is 08:51 PM.
|
|
 |
|
 |
|
|
|
 |
|
 |
|
 |


 Linear Mode

